Creating a stunning and accurate lip caricature is not an easy undertaking. Whether you’re an aspiring artist or an enthusiast seeking to enhance, shooting the diffused curves, dimensions, and details of lips may be challenging. It is where sketching hints come into play. Using tips not only improves accuracy but also affords a basic method for balancing proportions, symmetry, and realism in your drawings.
If you have struggled with getting your lip sketches to look simply proper, this post will break down the whole lot you want to understand about sketching with guidelines. From understanding lip anatomy and selecting the appropriate tools to exact steps and shading strategies, we’ve given you blanketed. By the quit, you may have the equipment and know-how needed to elevate your art and create beautiful lip sketches.
Table of Contents
Understanding the Anatomy of the Lips
Before placing a pencil on paper, it is essential to apprehend the anatomy of lips. The lips aren’t just a single, uniform shape—every element performs a position in their excellent appearance. By understanding their shape, you can higher reflect their natural look.
Key Parts of the Lips
Cupid’s Bow
The middle top of the higher-lip bureaucracy is a diffused curve. It is one of the defining functions of the lips and contributes to their distinct form.
Upper Lip (Superior Labium)
This part is fuller in the center and tapers at the edges. Often, the upper lip has more excellent described shadows compared to the lower lip.
Lower Lip (Inferior Labium)
Thicker and rounder than the top lip, the lower lip typically reflects light, growing highlights that add intensity to your caricature.
Lip Line
It is defined as the lips meeting the encompassing skin. The form and definition of the lip line can range from person to person.
Corners of the Mouth
The edges in which the upper and decreased lips meet create small crease-like information, which might be vital for realism.
Philtrum
The groove just above the middle of the lips and beneath the nostril provides size and symmetry to the face.
By breaking down the lips into these sections, you gain a clearer understanding of the shapes and info you will want to copy for your comic strip.
Tools & Materials to Get Started
The proper substances could make a big difference in the quality of your sketches. Whether you are a beginner or an excellent superior, here’s a short rundown of necessities tailored for lip sketching.
Pencils
- HB Pencils: Perfect for light tenet sketches.
- 2B–4B Pencils: Great for shading and adding smooth info.
- Mechanical Pencils: Ideal for growing sharp, unique strains like the rims of lips.
Paper
- Smooth Paper: Perfect for precise sketches as it lets in clean, precise strokes.
- Textured Paper (Bristol or Watercolor Paper): Suitable if you plan to feature intensity with shading or blending.
Erasers
- Kneaded Erasers for highlighting and solving small mistakes.
- Rubber Erasers for specific corrections.
Extra Tools
- Tortillon or Blending Stump for easy shading.
- Ruler or Drawing Compass if you want to help keep proportions in check.
With your equipment equipped, it’s time to transport directly to the principal occasion—creating lip comic strip suggestions!
Step-by-Step Guide to Creating Lip Sketch Guidelines
Here’s a simple breakdown of a way to create dependent and accurate lip sketches for the usage of tips.
1. Start with a Horizontal Line
The first step is drawing a horizontal guide where the lips will rest. This line aligns the top and lower lips and ensures symmetry.
2. Mark the Width of the Lips
Determine how huge you need the lips to be by including two vertical traces at the corners of your mouth. Think of those as bookends to your caricature.
3. Draw the Center Line or “Mouth Line”
Draw a curved middle line across the horizontal base. This line represents the parting of the lips, wherein the higher and lower sections meet.
4. Outline the Cupid’s Bow and the Upper Lip
Using the middle factors as a reference, sketch the definition of Cupid’s Bow. From right here, extend curved traces to the edges to complete the top lip.
5. Shape the Lower Lip
Sketch a gently rounded shape to decrease the lip. Keep in mind that it has to be fuller and slightly greater “puffy” than the upper lip.
6. Refine the Lip Lines
Once you’ve got the simple comic strip, add extra refined details, including the corners of the mouth, subtle creases, and mild asymmetries that make it look extra sensible.
Pro Tip: Work lightly along with your pencil during this step to make erasing and changes clean.
Tips for Adding Realistic Details and Shading
To elevate your lip sketches and cause them to pop, upload intensity and realism with those shading hints.
1. Study Light and Shadows
Observe how mild interacts with lips. The decreased lip frequently has highlights because of its rounded form, at the same time as the top lip, which has an extra shadow around the rims.
2. Use Gradual Shading
Blend softly with a tortillon or mixing stump to create clean transitions between highlights and shadows.
3. Define Texture
Lips aren’t perfectly smooth; they have natural strains and ridges. Lightly sketch this info to add Texture.
4. Create Contrast
Add darker shadows where lips meet or near the corners to decorate definition and measurement.
5. Keep Edges Subtle
Avoid harsh lines, especially on the lip outline. Smooth edges look more natural and lifelike.
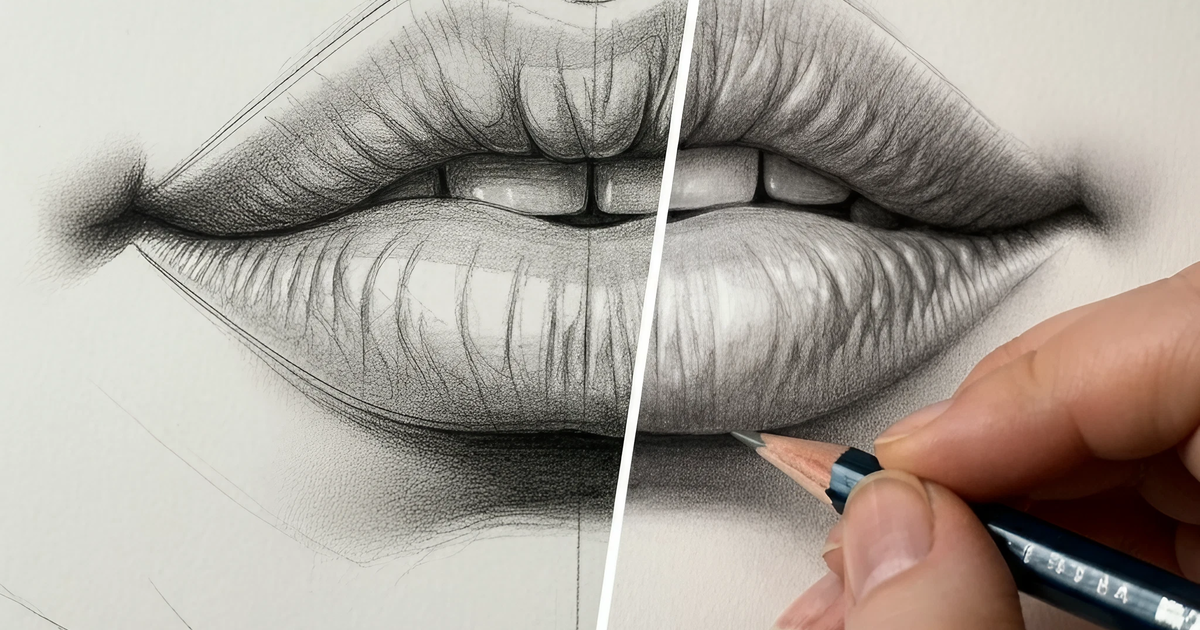
Why Guidelines Boost Accuracy and Realism
Wondering if guidelines make a difference? Check out this comparison between sketches with and without guidelines.
| Without Guidelines | With Guidelines |
|---|---|
| Lips are uneven and lack symmetry. | Lips are balanced and proportionate. |
| Difficult to refine details. | Easily add realistic details. |
| Lack of depth or accurate structure. | Clear, precise anatomy with depth. |
Following these steps and tips will greatly improve the structure and realism of your sketches.